I mean to do this post much nearer to the time, but as usual things conspired against me. Anyway, pancakes were had by EatingBritish on Tuesday, as per tradition. We went for the classic, with lemon juice and sugar, which I personally think is easily the best. Some of my friends however, apparently opted for a more diverse range of toppings, including even savoury things like bacon and mushrooms. I can imaging that would be very nice, but somehow wouldn't seem right to me to have on Shrove Tuesday. Actually, it would probably be very appropriate, but somehow I've always had my Shrove Tuesday pancakes with lemon and sugar, so that's the only way that seems 'proper'.
Pancakes, of course are super easy to make. All you need is plain flour, eggs, milk and a little water. Put the flour, with a pinch of salt into a large bowl and make a well in the middle. Add the eggs and mix together. Then, slowly add the milk and beat in until you get a smooth, fairly runny batter. I know I haven't quoted any quantities, but it depends on how many pancakes you want to make! To be honest, quantities are not so important here, just aim for the right consistency of batter at the end. With a bit of practice, you'll soon get it just right. Then, just pour the mixture, in small quantities into a hot, oiled pan and allow to run to the edges:
Allow to cook on one side for about a minute, then flip over and do the other side. Serve and eat immediately!
This blog was originally about my attempt to live for a whole year, from August 2007 to August 2008, eating only food that had been produced in Britain. My aims in this were to see if it was actually possible and to try to promote British food. Well, I survived the year without too much difficulty! So I have decided to continue the blog, this time looking at all that can be produced in Britain and how British ingredients can be used to create some fantastic dishes.
Showing posts with label recipe. Show all posts
Friday, 24 February 2012
Saturday, 28 August 2010
Roast topside of Water Buffalo
This was something of a surprise find in the freezer section at Sunnyfields - Water Buffalo meat! The Water Buffalo are reared here in the UK, at Broughton Farm in Hampshire (more info here). They had buffalo mince and topside joints available, so I though it would be good to do a version of the British classic, roast beef. But with buffalo.
To start with, defrost the meat. It is best taken out of the freezer in the morning of the day you plan to cook it, assuming you'll be having it as an evening meal. When it's defrosted completely, pre-heat the oven to 220C. Liberally season the meat with salt and freshly ground black pepper. The piece I bought had some string tied around it to keep it all together, I left this on until it was cooked. Next, roughly chop four or five carrots and three small onions and place in the bottom of a roasting tray. Drizzle the vegetables with a little oil (I used rape seed oil) and place the seasoned meat on top.
Now, place this onto the middle shelf of the pre-heated oven and immediately turn the temperature down to 180C and leave for around 2 hours. Baste the meat with the juices which will collect in the roasting tray about every half an hour or so. After 2 hours (the exact cooking will depend on the size of the piece of meat, so you'll have to use your own judgement a bit here), turn the temperature down to 160C for a final half-an-hour. Then, remove the meat from the oven.
Take the meat out of the roasting tray and put to one side, strain the vegetables and juices into a suitable container (this makes very good gravy!). Now, put the meat back into the roasting tray and cover with kitchen foil. Now leave it for 10 - 15 minutes to rest before serving.
To test if it's cooked properly, before removing from the oven completely, use a metal skewer to make a hole right through the thickest part of the meat, from the top. Remove the skewer and watch the juices that come out, if they are clear and not cloudy, the meat should be cooked. Repeat the test in several areas to make sure. There are fancier ways of doing this, a meat thermometer is probably the best way, especially if you want you meat anything other than well done, but I don't have one of those.
Anyway, that's it! Serve with whatever vegetables you like.
It has a really excellent flavour, kind of like beef, but also quite different. The fat, in particular, tastes very different. Buffalo meat apparently contains less than half the fat of beef, so it can't be bad! I would recommend trying it. I intend to have a go at making burgers from buffalo mince at some point, so I shall certainly blog about that when I do.
Labels:
beef,
local food,
recipe
Thursday, 5 August 2010
Welsh lamb burgers with fresh mint and rosemary
Judging by my last shopping trip, Welsh lamb seems to be very much back on the shelves, at least at my local supermarket. So, I couldn't resist picking up some minced lamb, which is great made into burgers. Minced lamb has a fairly high fat content (around 20%) compared to minced beef, but this really helps to keep things like burgers moist when they cook. Beef burgers can end up being a bit dry much more easily than lamb burgers. Like nearly all of my recipes, this is really easy to do. Simply place 500g of minced lamb into a large bowl:
This was also a good excuse to use some of the herbs of been growing on my patio, so I picked a reasonable handful of mint leaves and a few sprigs of rosemary. I then washed these and chopped them fairly finely before adding them to the meat in the bowl. I also added a generous measure of freshly ground black pepper, a good pinch of salt, a finely chopped small onion and one egg. The easiest way to mix this all together is by hand, so get stuck in!
Now, heat some oil in a pan, to a fairly high heat, but not smoking. Take small handfuls of the mixture and kneed them in your hands to a suitable 'burger' shape, making sure that they are not too thick. Place these in the hot pan and fry for something in the region of 7 to 8 minutes per side. The exact time will depend on how thick you make them, thinner ones will be quicker and fatter ones will take longer. You can always cut one open when you think they are done, just to check.
Serve! Of course, burgers go well when in buns, but I didn't have any, so I had mine with potatoes and British corn on the cob.
Very tasty it was to!
Tuesday, 3 August 2010
Honey glazed pork chop with British corn on the cob
I picked up this jar of honey at my local butcher shop today, so thought I should use it. Pork chops can be good, but a honey glazed pork chop is just better! It's very easy to do, simply season the pork chop with some freshly ground black pepper and some course sea salt on both sides.
Heat some oil in a frying pan to a reasonably high heat and cook the pork chop on one side until it is cooked about half way through.
Now, turn the heat down and gently pour a generous teaspoon of honey onto the uncooked side of the pork chop. Allow the honey to run over the top and then turn the chop over, placing the honey side down in the pan. The honey will quickly caramelise and you should see the caramel creeping out from under the pork chop. It's important that the heat isn't too high at this stage because we don't want to burn the sugar.
Let it cook until it's cooked through, which will probably take another 10 minutes or so, but this will depend on the size of the chop. It should turn a lovely, golden colour on the honey side. You can turn it over again for a few minutes if you want the golden caramel colour on both sides.
I was keen to find a way to use some of the British sweetcorn I bought the other day, so I cooked the cob in lightly salted, boiling water for about 10 minutes, until tender. Served this way with a knob of butter, it's absolutely delicious.
Thursday, 22 July 2010
Paprika Beef
A nice, simple dish that can be made with a relatively cheap cut of beef, such as braising (or chuck) steak.
When using these cuts of meat, they can be a bit tough, but this problem can be solved by pounding the meat with a meat hammer. If you don't have one of these, you could always use a rolling pin or something, but you'll need to hit it quite hard. The advantage of using a meat hammer is that they have a face with a number of sharp points on it which really helps to tenderise the meat. Anyway, once that's done, cut the meat into strips.
Then, a hot frying pan, cook the meat along with a roughly sliced onion.
The frying pan shown here is a cast iron type, which adds a wonderful flavour to many dishes, in particular steak. However, any frying pan will do really. While the meat and onions are cooking, season liberally with paprika, freshly ground black pepper and a pinch of salt. Once the meat is cooked through (roughly 5 minutes per side, if you've pounded it quite thin), transfer to a sauce pan. Add some water to the frying pan and use a spatula to make sure anything left over from the frying is transferred to the water.
Remember, this was a cast iron pan! If you're using a non-stick pan, don't use a metal spatula! Pour the water from the frying pan into the sauce pan, cover and simmer gently for 20 to 30 minutes.
That's it! This is particularly good served with mashed potatoes and peas.
Friday, 16 July 2010
Barbecue trout
The weather here in the UK has, for most of us at least, been fantastic for the last few weeks. Some have even complained that it has been too hot! Typical then, that on the day I should decide to have a barbecue, it turns out to be pouring with rain. Anyway, I'm not the kind of person to let a mere bit of weather get in the way of a good plan, so I persevered. I have been meaning to write about barbecues for a while, since although I like a good barbecue as much as anyone I often find that they are far to heavy on the red meat front. Its always sausages, burgers, steak and maybe some chicken legs if you're lucky. There's nothing wrong with any of those of course, it's just that I find it hard to consume nothing but red meat! So, I have set out to try barbecuing fish, in this case trout.
Here we have your basic farmed trout. I'm not sure of the exact species, but I suspect from the pale pink band down its side that it is a rainbow trout. Now, I've been fishing once or twice and I know that a rainbow trout caught in the wild looks much more obviously like its name-sake, but for a farmed fish this isn't a bad example. My friendly, local fishmonger has already gutted this fish for me and I suggest that you get yours to do the same. The first thing to do, as the coals of the barbecue are heating up, is to wash the fish to remove any remaining blood from inside.
That's more or less all the preparation the fish needs! All that remains is to season the inside of the fish with some salt and freshly ground black pepper. I also added some roughly chopped fresh parsley and a couple of bay leaves. I then used some wooden cocktail sticks to hold it all together so that the herbs wouldn't fall out during cooking. That's the fish ready for the coals!
Since I didn't feel that the trout would be quite enough for one meal, I've also added some sausages and an orange pepper (barbecue's particularly well I find, particularly when seasoned with black pepper and a little olive oil. Leave it until the skin starts to go black). In this case, the fish took about half an hour to cook, 15 minutes per side.
I've served this with a basic potato salad made from new potatoes boiled with the skins on, which were then left to cool and sliced into a mix of natural yogurt and cream, along with some chopped spring onion and some freshly ground black pepper and salt. The fish was really nice, although trout has a very subtle flavour so you have to be a bit careful not to overpower it. Ideally, I would have added some fresh dill to the herbs I put inside the fish, but I didn't have any on this occasion. Let's hope that the sunny weather comes back!
Thursday, 15 July 2010
Sausage gratin
This is a slight variation on a recipe I've done before with sausage and asparagus, but it's a great way of cooking sausages if you're fed up of frying or grilling them! To make, simply cook some potatoes in lightly salted, boiling water until they are nearly done. Test them by sticking a fork or a skewer in and feeling the texture, it should still be firm and just ever so slightly 'gritty' which indicates that the potato is not fully cooked. As we are going to be finishing them off in the oven, this is OK.
While the potatoes are boiling, wash and chop some asparagus, peel and finely chop an onion, slice the sausages (I used three good sized, pork and apple sausages in this case) into good sized chunks. Layer all of these ingredients into a heat proof dish, with the chopped onion at the bottom. I added a layer of cherry tomatoes as well, as you can see. I also put in a good bunch of freshly chopped herbs, in this case thyme, rosemary and sage. A small pinch of course sea salt is a good idea at this stage to. In this case, I am relying on the tomatoes to produce juice as they cook. If you don't use tomatoes, you might find it necessary to add a little stock - chicken or vegetable would work well.
Once you've done that, slice the par-boiled potatoes and use the slices to cover the top of the dish, like so:
Add some grated cheese and some freshly ground black pepper and place in a pre-heated oven at 180C for about 40 minutes to an hour. You can tell when it's cooked because the top will be all nice and brown and the juices in the bottom of the dish will be bubbling away nicely. I'd recommend at least 40 minutes though, just to make sure that the sausages are cooked through properly.
Monday, 5 July 2010
Marrow and broad bean risotto
I mentioned in my last post that I would write something about marrows, so here we are! I think, as vegetables go, marrows are fairly exciting. To start with, they are quite big and can be huge! Secondly, I think anything that has stripes just looks good. Marrows are the tigers of the vegetable world. Truly, a vegetable to admire. Handily, they taste pretty good to, if you cook them right. This is one vegetable that I would not recommend eating raw. As far as I am aware, doing so won't do you any harm, it just doesn't taste that great. So, I decided to turn this marrow into a risotto.
This is very easy to do. Simply wash the marrow and then cut it into roughly 1cm cubes. Meanwhile, heat some oil in a heavy-based sauce pan (olive or rape-seed oil works very well) and when hot, add some finely chopped onion. Cook the onion until it is nice and soft and just starting to turn brown. Now, add about half a cup of risotto rice. I use Arborio rice, which is particularly good I think. Stir the rice around with the onion and then add enough chicken stock to just cover the rice and onion. Then, put the lid on the sauce pan and leave it simmering for a while. Keep an eye on it and when it looks like most of the fluid has been absorbed, add a little more to again just cover the rice. For half a cup of rice, you'll want about 450ml of chicken stock. You may want to give it a stir from time to time as well to make sure it doesn't stick and burn in the bottom of the pan.
Once you've added about half the stock, add the chopped marrow. Now, I have chosen to add broad beans as well, because they are in season right now, so these can go in at the same time. Flavour the dish with some freshly chopped sage, ground black pepper and a pinch of sea salt. A knob of butter really adds to the flavour, but is optional. Stir it around and add the rest of the stock. Put the lid on the pan and leave it to simmer until the marrow has gone really soft and most of the fluid has been absorbed. That's it!
Now, a risotto should really be served with Parmesan cheese, but of course that's not British. So, I have to admit I went without the cheese, but it would be really good to be able to find a good British alternative to Parmesan. I shall investigate this.
Tuesday, 8 June 2010
Fish and chips
Personally, it always annoys me slightly that whenever you ask someone to think of an example of British food, the first thing they'll almost always say is fish and chips! Whether we like it or not, I guess this dish has become the icon of British food. According to the Wikipedia article, Fish and Chips as a dish originated in the UK in either 1858 or 1863, so it's certainly been around for sometime. It is actually quite hard to think of another, similarly iconic British dish, unless you start thinking of Chicken Tikka Masala and that sort of thing.
Anyway, I felt that I wanted a change from my usual boiled potatoes the other day, so I set about making my own chips, which I had with a salmon fillet, so this isn't your classic fish and chips dish by any means.
So, to make chips, first cut a large potato into chip-like shapes. This was actually a baking potato and I know that 'professional' chip makers think that the variety of potato makes a huge difference to the quality of the final chips. They are probably right and I think a lot of it has to do with water content, with a higher water content being better. These were Estima potatoes, grown in Suffolk and they seemed to work well. I deep fried them in olive oil, keeping the heat below the smoke point of the oil. Now, I could have used the cold pressed rape seed oil which I've used for various things here before, perhaps I should have done really given that it's British, but it is also quite expensive! Of course, it's smoke point is much higher than that of olive oil, which may have made it better, but to be honest, the olive oil seemed to work quite well.
I let them fry, stirring them around occasionally, until they just started to brown. I then removed them from the oil and allowed them to cool completely, which took about 20 minutes, before putting them back in the hot oil for another 15 to 20 minutes to finish off. It is really important to let them cool completely like this if you want them to be crispy on the outside and nice and soft and fluffy on the inside! It takes a bit of time, but it's worth it.
So, after letting them cool (as shown in the above picture), I fried them again to give the finished result:
They really were extremely good, even if I do say so myself! The crispy outside layer had swollen up and separated from the fluffy inside on many of them, which gave them the most delightful texture. The olive oil also seemed to impart a good flavour. Of course, you always need to be careful deep frying things like this, but I used the absolute minimum amount of oil in the pan and had a damp dish cloth ready in case of a fire! I'd recommend that you do the same if you try making chips this way.
Tuesday, 18 May 2010
British air dried ham and early season asparagus
Dear Readers!
I must apologise for the rather long break I've had from the blog! But, do not dispair, I have not given up on the project. April turned out to be a rather hectic month and I ended up getting stuck in Canada because of the Volcano and, well, lot's has been happening, so unfortunately the blog took a back seat there for a while. Anyway, I'm back now and there is quite a lot of catching up to do!
My regular readers will remember that I did quite well with growing tomatoes last year on my little patio. Well, I'm trying to do even better this year and have gone all out and got some nice pots. I'm trying to grow all sorts of things this time round, including radishes (which have to be the easiest to grow vegetable ever!), spinach, spring onions (though they're not looking so good), tomatoes, mint, thyme, lemon thyme, rosemary, sage, corriander and alpine strawberries. I shall post some pictures of all of this at some point in the near future and will of course keep you up to date with my progress!
Anyway, today I'd like to blog about the British air dried ham that I bought at Richard Woodall's butchers in the Lake District some time ago. I finally got around to using it! This ham is very much like Palma ham from Italy, if you've had that and as such goes very well with asparagus. Now, of course, asparagus is in season right now (make the most of it, it's a short season!), so I thought that this would make the perfect combination.
And the ham:
Now, this is really easy to do! I've found that many people will say that they don't like asparagus, but I often find that this is because they have never had it when it has been cooked properly. All too often, it's served after having been boiled and it has turned to nothing more than a slightly strange flavoured green mush. This is not good! Asparagus must be cooked gently in my opinion, or very quickly on a high heat. So, grilling works well, or the BBQ! However, in this case, I've opted for boiling in lightly salted water.
Trim the woody part off the bottom of the stalk, but otherwise they should need no preparation beyond washing. Get the water boiling rapidly and then add the asparagus and start a timer. I let it boil for as close as possible to three minutes and then whip it out as fast possible onto some kitchen paper to dry off. For this dish, I then allowed it to cool, before carefully wrapping each stalk in a piece of the ham, like so:
Personally, I think this is a fantastic combination and it seemed to work very well with the Richard Woodall ham. However, aware that nobody should simply take my word for it, I took some to work and shared them around with my work collegues. It seemed to go down very well!
Labels:
asparagus,
recipe,
Richard Woodall
Tuesday, 30 March 2010
Salmon Risotto
On the meat front, the original EatingBritish project was actually quite easy. A quick glance over almost any supermarket meat section will reveal that a significant quantity, if not all, of the meat was produced in the UK. However, one of the areas that does become slightly questionable is fish. When is a fish a British fish? When it's caught in British waters perhaps? I'm still slightly undecided on this issue myself, so instead I make do with sustainably farmed fish, which is definately produced in Britain! In this case, I am using Scottish farmed salmon. I quite like a nice piece of salmon every now and again, particularly pan fried (click on the 'fish' label to the left to see more recipies). However, I thought I would try something a little different this time round and so I tried a salmon risotto.
Salmon is ideal for a risotto because it requires only the gentlest of cooking, assuming its nice and fresh to start with, so it can go into the cooking pot right at the last minute. Here is a nice piece of Scottish farmed salmon:
To make the risotto is really easy. Heat some oil and butter (the oil raises the smoke point of the butter, allowing a higher heat to be used, but still giving the nice buttery flavour) in a pan and fry a finely chopped onion on a medium heat until soft. Add about half a cup of rice. Some would say to use risotto rice, which is certainly very good, but to be honest I used regular, long grain rice and it worked just fine for me. Stir this around for a couple of minutes. Meanwhile, make some chicken stock (I just use cubes, but if you have fresh stock it would be awesome!). After the rice has been in the butter/onion/oil mixture in the pan for a few minutes, start adding the stock. You want to do this quite slowly, allowing it to be absorbed by the rice before adding a bit more. For this amount of rice, I found 3/4 pint of chicken stock worked very well. You can always add more water if the rice still isn't cooked by the time you've used up all the stock, but it's much harder to take excess water out without over cooking the rice!
While the rice is cooking, cut the salmon into cubes, removing the skin first if it was still on. Once the rice is cooked, add the salmon, some chopped basil (dried works OK, but fresh would be so much better!) and two table spoons of double cream. I also added some pine nuts because I like them and some halved cherry tomatos. Stir this all together over a low heat. Continue to cook until the salmon has turned nicely pink and is starting to fall apart. Most risotto recipies would call for Parmesan cheese to be added, but of course, Parmesan cheese is not British. It's an excellent cheese, but I didn't have any and I was keen to try a British alternative. So, I used some of the Winchester mature chedder I've blogged about before (see here), which was a nicely mature chedder with a fairly robust flavour which I think did it's job as a Parmesan replacement fairly well.
This was the end result:
Tuesday, 9 February 2010
Venison Meat Balls
One of the other products I picked up while I was last at Sunnyfields Farm Shop & Market was a pack of venison meat balls. I opted to cook these in the simplest way I could (my regular readers might spot a trend here!), which was to pan fry them and serve them with a rich tomato and herb sauce. Pan fry on a medium heat, turning occasionally until cooked through (the juices should run clear when they are cooked, but I prefer to cut one in half just to check - you can always cover this one with plenty of sauce so that no one can see!).
To make the sauce, heat some oil in a heavy-base sauce pan, then add a finely chopped onion and fry until soft. Add three cloves of garlic, finely sliced and a generous measure of finely chopped basil and parsely. I tend to use dried herbs, but I am hoping to start growning my own once the weather starts to get a bit warmer. Season with freshly ground black pepper and continue to fry, stiring often, for another minute or so. Add a tin of chopped tomatos. At this time of the year, there are no British tomatos available and the tinned variety offer an excellent way of getting a good, solid tomato flavour into food. Go for the highest quality ones you can, the own-brand ones can be OK, but they tend to be more acidic than the slightly more expensive varieties. Add a generous measure of soy sauce, cover and simmer gently. Leave to simmer for about 10 - 15 minutes. The soy sauce should add enough salt, but taste the sauce as it's cooking and add more if you feel it needs it.
I served my venison meat balls with the tomato sauce and peas on a bed of pasta.
Labels:
local food,
recipe,
venison
Wednesday, 5 August 2009
Home made, fresh chicken stock
If you followed my recipe for roasting a chicken, then you'll have the vegetables (onion, carrot, celery) left over from the roasting tin. Put all of these, along with the carcass into a large saucepan and add enough water to nearly cover everything:
Now, cover the pan and bring to the simmer with a low heat. Leave it simmering for approximately two hours or so. You'll need to check on it from time to time to make sure it isn't getting too dry, so add more water every so often. After about two hours, it should look something like this:
When it is done, the bones will be completely clean and the carcass will have fallen apart. Now, to extract the stock, simply strain this through a sieve, using a fork or something similar to squeeze out every last drop of juice. When that's done, you should end up
with something like this:
Once this has cooled down, it can be frozen and kept for quite a while. Fresh stock is excellent for making risotto! Enjoy.
Labels:
recipe
Monday, 27 July 2009
Roast Chicken
As it's cooking, take it out of the oven a couple of times to baste it. Simply tip the tray up and use a spoon to cover the roasting chicken with the juice that will have formed in the tray. Once the chicken is cooked, it's time to make the gravy. This is really easy and I don't know why more people don't make their own gravy when the cook a roast - the flavour is so much better then the dried gravy granules that you can buy. Remove the chicken from the tray and leave on a plate to rest, covered with a sheet of kitchen foil to keep the heat in. Using a sieve, strain out the contents of the roasting tray into a suitable container, such as a measuring jug. Then, pour a few table spoons of cold water into the roasting tray and stir this around to pick up the last of the juices. Pour this into measuring jug with the rest of the strained juice. You will probably find that the gravy separates into two layers, the top one of which is fat. It's probably not a good idea to have too much fat in your gravy, so you can use a spoon to carefully remove as much of this layer as you can. Once that's done, you can thicken the gravy if you want. To do this, simply mix a little flour into some cold water in a cup. Then, place the gravy into a small pan on a low heat and slowly add the flour and water mixture whilst stirring, until you get the desired consistency. That's it! It might sound a lot, but it really is very simple and the same procedure can be used to make gravy from other meats as well as chicken, such as roast beef.
I like to keep a roast simple, so in this case I served it with boiled potatoes, English green cabbage
Labels:
recipe
Tuesday, 7 July 2009
Pad fried British chicken breast with sautéed vegetables
First of all, lightly season a chicken breast with salt, freshly ground black pepper and some dried basil. I tend to use dried herbs for this kind of cooking, saving the fresh stuff for use in salads and stuff, where it has more impact.
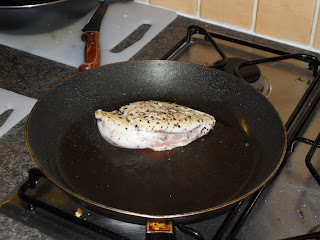
Then, heat some oil in a pan, you going to want it to be really quite hot to start with, but not quite smoking. Place the seasoned chicken breast into the pan and fry on a high heat on each side until brown. This will take around 2 to 3 minutes for each side. The idea here is to seal in the juices of the meat. Once sealed, turn the heat down and cook for about 20 minutes, turned occasionally. If the chicken breast is really thick or you want it to cook more quickly, then you can 'butterfly' it. To do this, simply cut it length-wise down the middle, but not all the way through, so that you can open it up, in a manner similar to opening a book. This way, the two halves will be thinner and so will cook much more quickly.
While that's cooking, it's time to sauté the vegetables. In this example, I used the most exciting British vegetables I could find. At this time of the year, that includes quite a lot, so I have used red and yellow sweet pepper, courgette, aubergine, mushrooms and spinach. Simply slice and chop all the vegetables, as you would for a stir fry. I fried some chopped onion first and then added the aubergine, followed by the mushrooms, the courgette, the pepper and finally the spinach, waiting for around 2 minutes between each and stirring continuously. I used a good handful of spinach leaves, which looks a lot when you first put it in the pan, but the leaves shrink to a fraction of their original size as they cook. Season with salt, freshly ground black pepper and some dark soy sauce. Cook for a further 5 minutes or so, stirring regularly.
I find that you can often tell when the chicken breast is cooked through by poking it with a sharp stick, or a fork, whichever is most convenient at the time. The idea is to make a small hole through the skin and into the meat. If the juice that comes out of this hole (you might need to press down on the chicken breast around it) runs clear, then it is probably cooked. Like all recipes, I suggest you try this out just on yourself to begin with, so you can remove the meat from the pan and cut it in half to check. With practice, you'll get it right.
Once everything is cooked, slice the cooked chicken breast into strips and serve on a bed of the sautéed vegetables, with boiled new potatoes. Nice.
Labels:
in season,
mushrooms,
recipe,
sweet pepper
Subscribe to:
Comments (Atom)


